
HR, payroll and self-service
HR has two faces. The HR app is for the HR team and the managers who approve leave and expenses. My HR is the one page every employee has.
On My HR, employees check in, apply for leave, claim expenses and open payslips. Payroll is a module of its own; when it is not part of your plan, the payroll screens are hidden.
The HR home
Section titled “The HR home”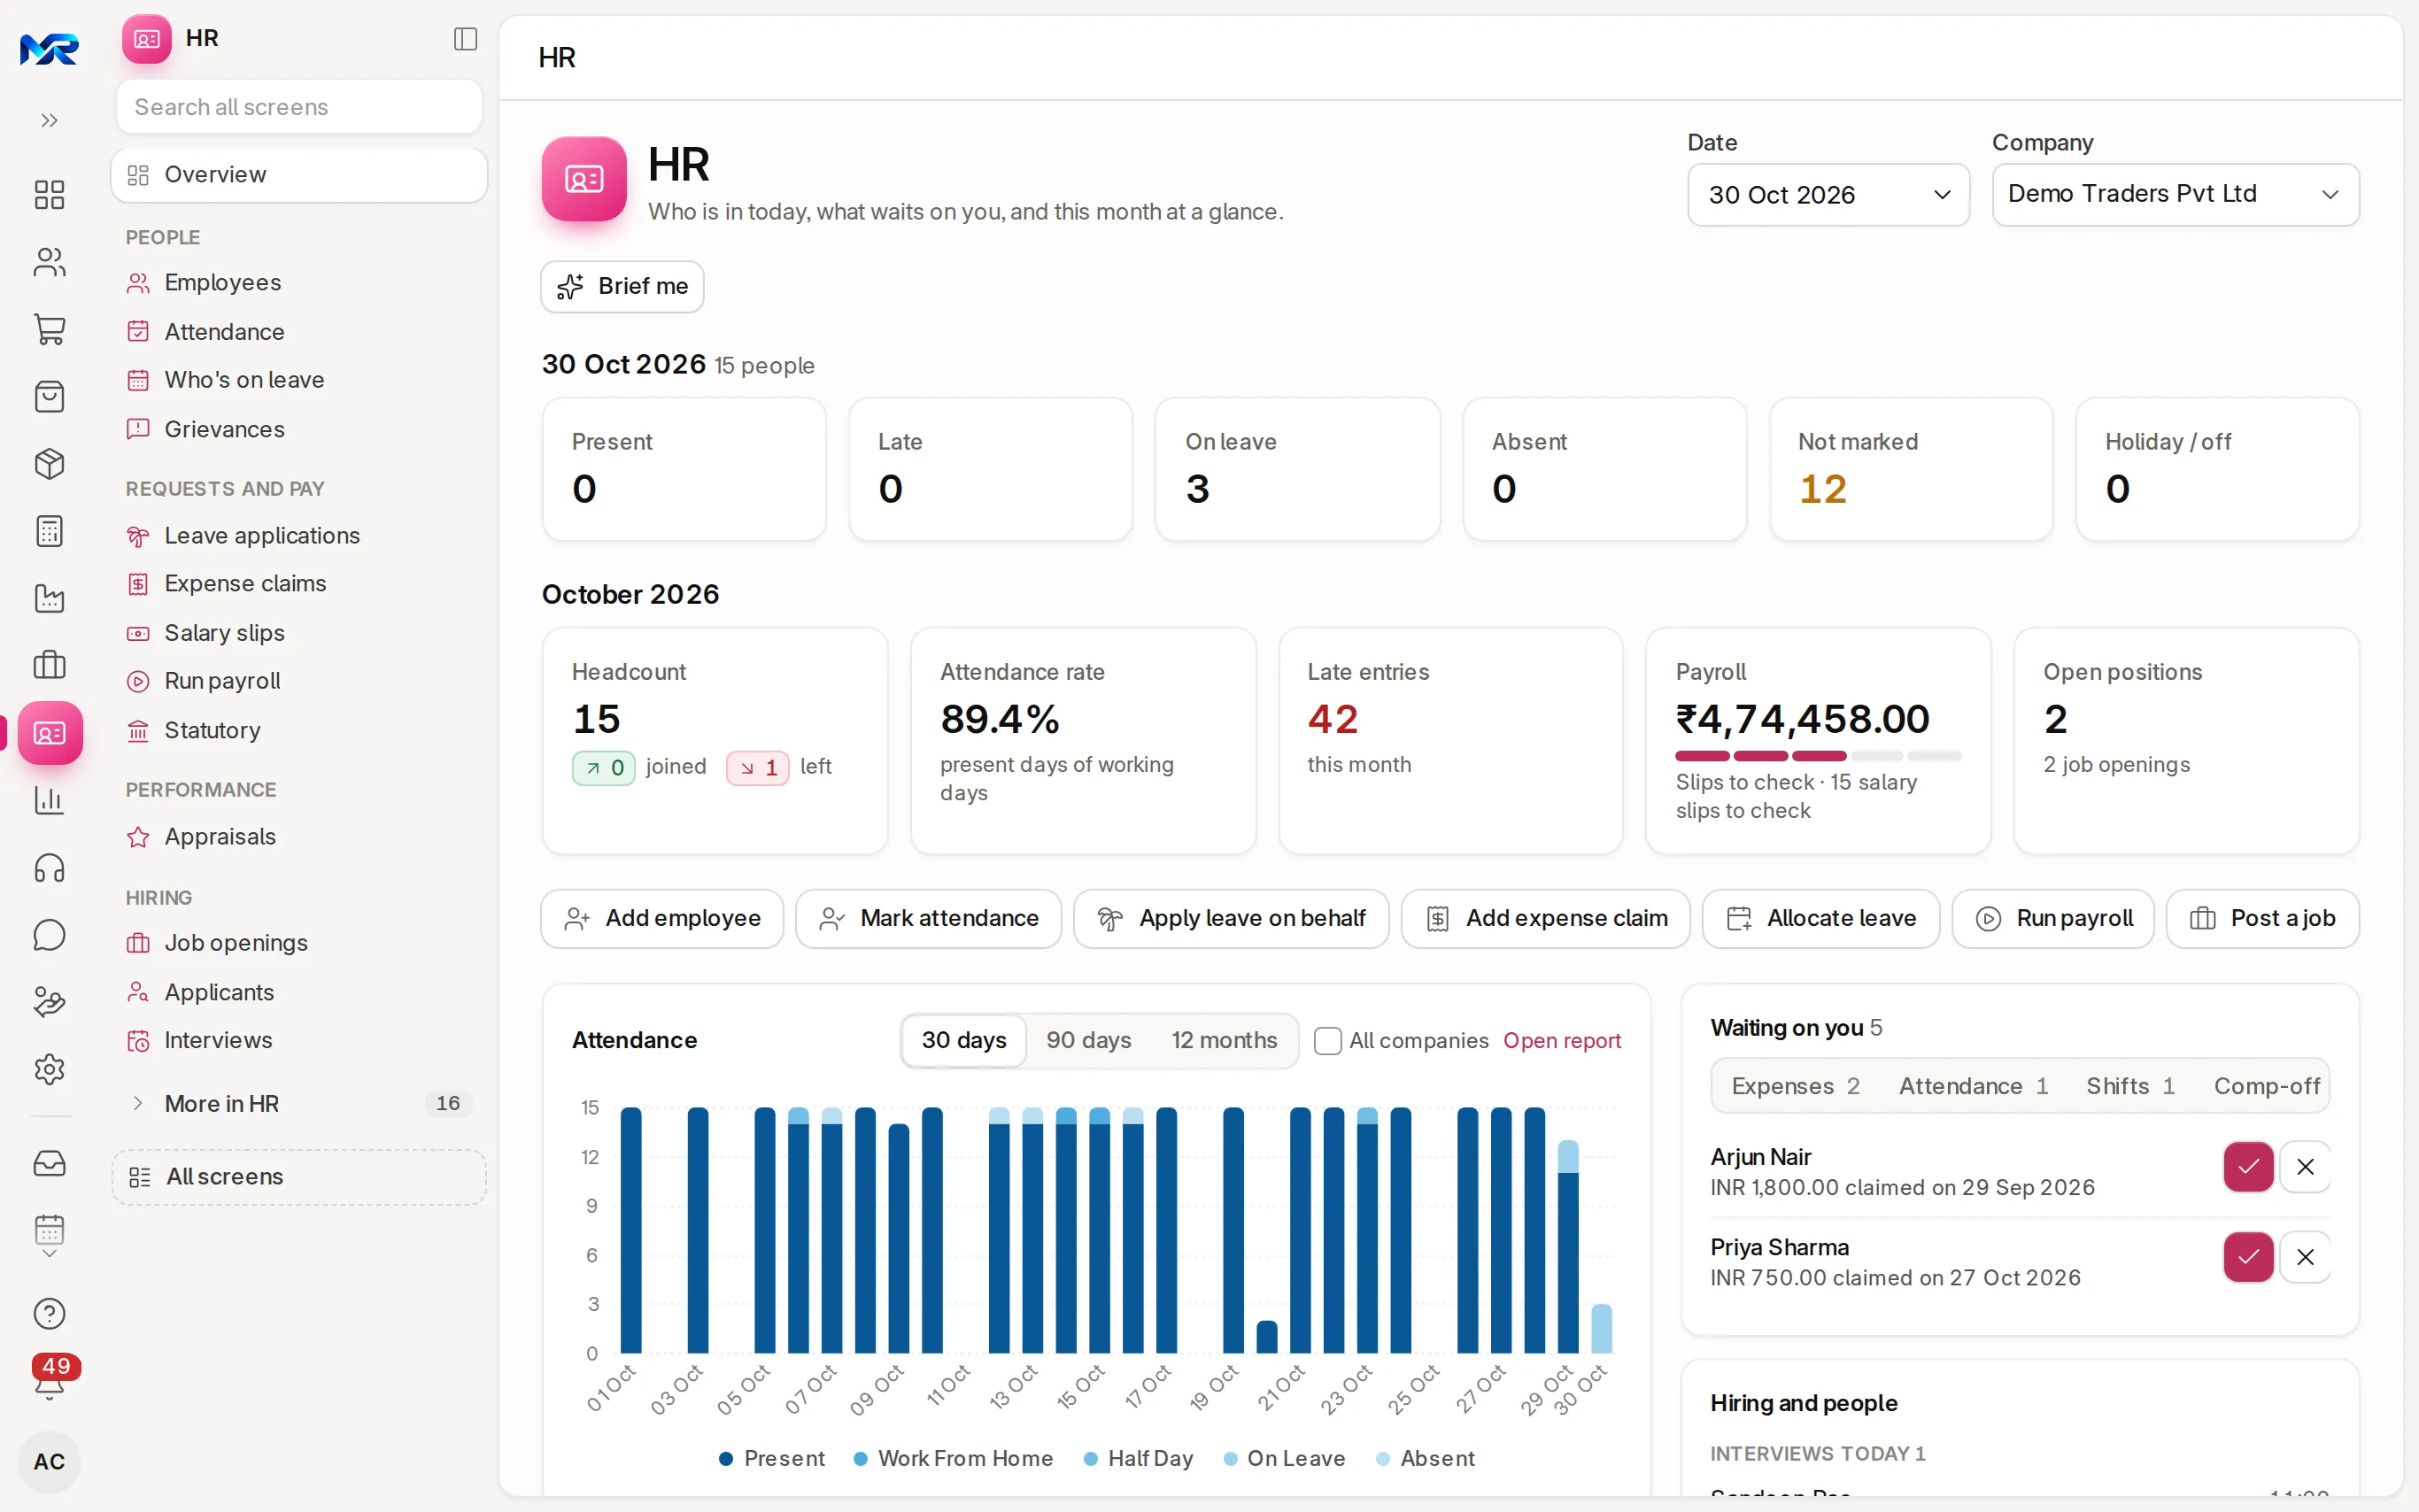
Pick the Date and the Company at the top right to look at another day or company.
- Today: how many people are present, late, on leave, absent, not marked, and on a holiday. A large “Not marked” figure means attendance still has to be marked.
- The month: headcount (with joiners and leavers), attendance rate, late entries, the month’s pay run and open positions.
- Buttons: Add employee, Mark attendance, Apply leave on behalf, Add expense claim, Allocate leave, Run payroll and Post a job.
- Waiting on you: the leave, expense, attendance, shift and comp-off requests you can decide, with approve and reject on each row.
- Hiring and people, Due soon (settlements, separations and onboarding to finish) and Upcoming holidays; Brief me asks the AI assistant for a short summary.
The everyday menu
Section titled “The everyday menu”| Group | Entry | What it is for |
|---|---|---|
| People | Employees | Everyone who works here: job, reporting line, bank and ID details |
| Attendance | Who is in today, the month muster, late and missing punches, requests and shifts | |
| Who’s on leave | Who is off and who has asked: team timeline, month and week, with holidays | |
| Grievances | Complaints raised by employees, from open to resolved | |
| Requests and pay | Leave applications | Leave requested by employees: approve or reject here |
| Expense claims | Money employees spent for work and want paid back | |
| Salary slips | Each employee’s payslip: earnings, deductions, net pay and year to date | |
| Run payroll | The month’s pay run step by step: checks, slips, review, pay | |
| Statutory | PF, ESI, PT, LWF and TDS for a month, due dates and ECR file | |
| Performance | Appraisals | Performance reviews; each opens its cycle’s progress |
| Hiring | Job openings, Applicants, Interviews | From the opening to the offer |
More in HR holds the rest, such as check-ins, shifts, holiday lists, employee advances, Pay expense claims, Statutory registers, training, the Openings board, job offers and appraisal cycles.
Add an employee
Section titled “Add an employee”- Open Employees and press New, or Add employee on the HR home.
- Fill the fields marked *: First Name, Gender, Date of Birth, Date of Joining and Status.
- Under Company Details, pick the Company and, if you use them, Designation, Department and Reports to.
- Under User Details, pick the person’s sign-in in User ID, or tick Create User Automatically. Without this link the person cannot use My HR.
- Press Save. Then fill the other tabs as needed: Address & Contacts, Attendance & Leaves (holiday list and leave approver), Salary (pay, PAN, UAN, ESIC number and bank details with IFSC), Personal Details, Profile, Joining and Exit.
Bank account numbers, PAN, Aadhaar, UAN and passport numbers are encrypted when stored. Only the screens and reports that need them show them.
Attendance
Section titled “Attendance”- Employees check in from My HR; their shift turns the punches into attendance by itself.
- Attendance › Today shows each person’s status, shift and punch times; click a tile to see just those people, then Mark attendance. Mark a range marks one person over many days.
- Muster shows the month for everyone: click a day to change it, or select many days and press P, A, H, W or L. Exceptions lists late arrivals, missing OUT punches and unmarked days.
- Ask answers questions such as “Who had more than 3 absents in September?” and prepares commands such as “Mark all Sales present on 24 Oct except Ravi”. A photo of a paper register can become attendance once you check it.
Approve leave and expense claims
Section titled “Approve leave and expense claims”Every request that needs your decision lands in Approvals (the inbox icon on the rail): leave, expense claims, attendance, shift, comp-off and travel requests. The tabs are To approve, Assigned to me, My requests and Done (and Delegated to me while you cover for someone); chips narrow the list to one kind, such as Expense Claim.
- Read the row: the person, the dates or amount, and how long it has waited. Click it to see the lines, attachments, leave balance and history.
- Press Approve, or Reject and write the reason. The employee sees your reason in My HR and gets a notification.
- To decide many at once, tick the rows first.
An expense claim with no receipt attached asks you to confirm before you approve it; it never blocks you. Going on leave yourself? Press Delegate while away so someone else can approve in your place.
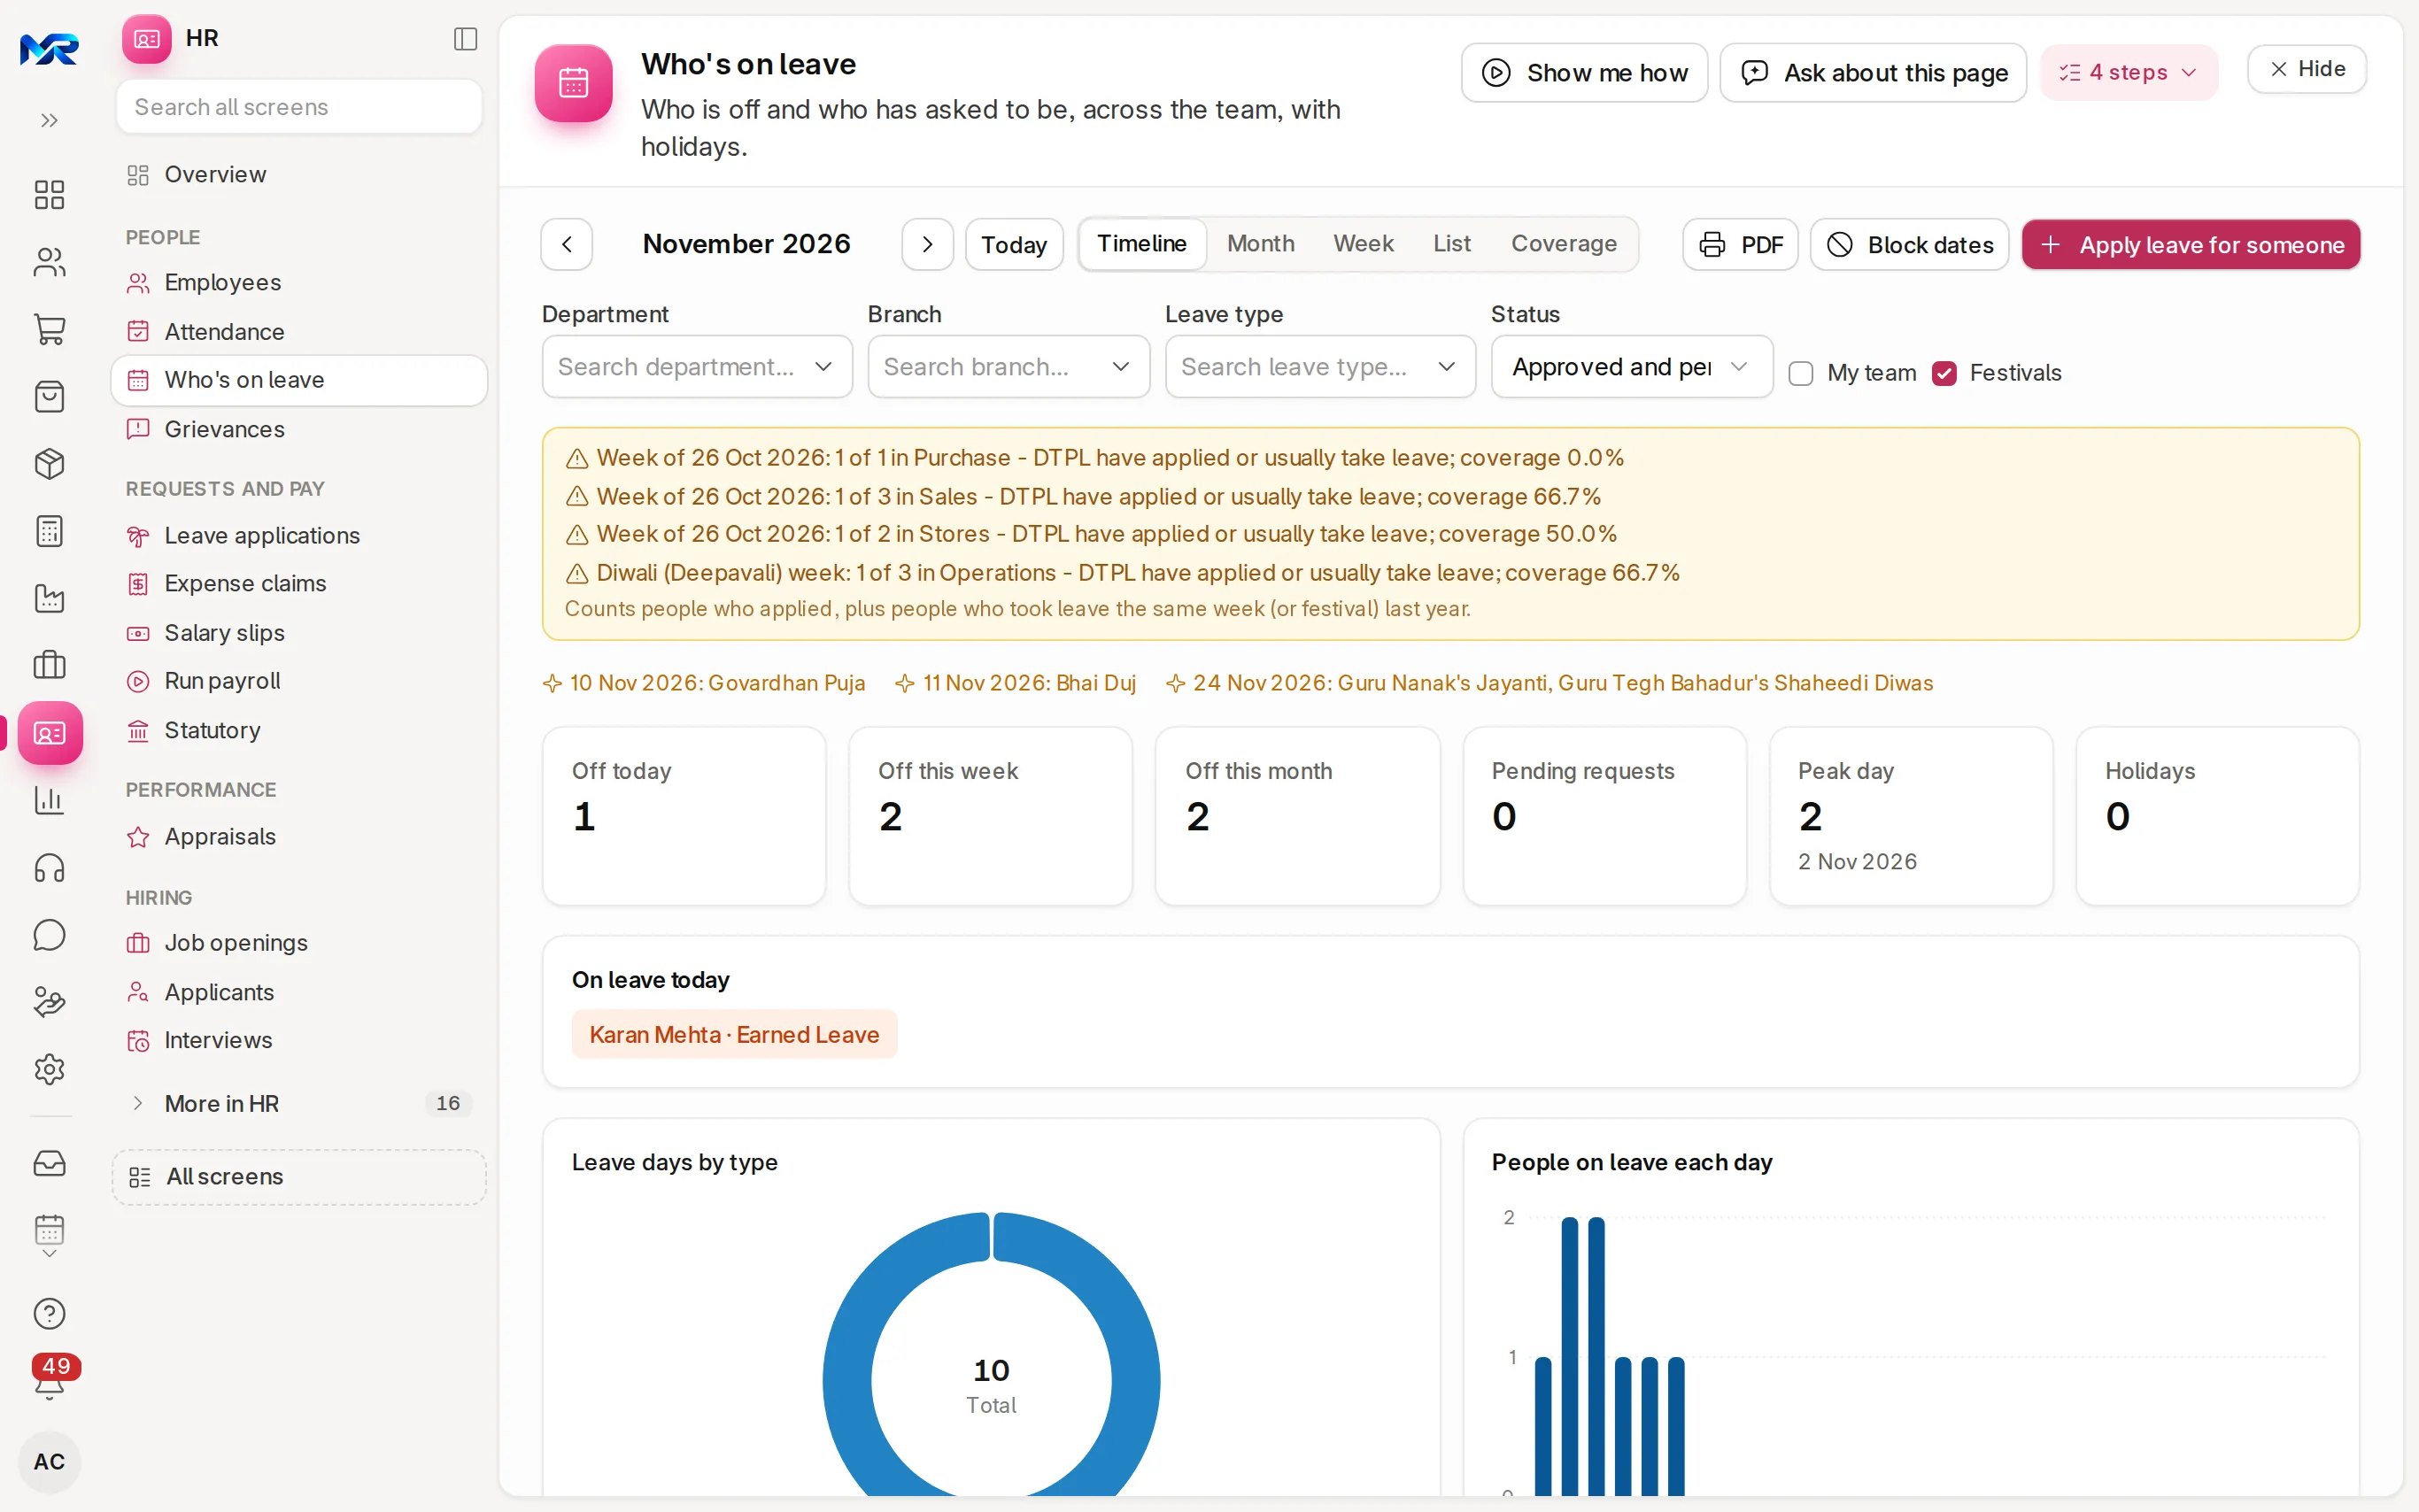
Who’s on leave shows the team’s leave on a timeline or calendar; click a leave to approve or reject it with the calendar in view.
Run the month’s payroll
Section titled “Run the month’s payroll”Run payroll shows the financial year as month cards, each with its state (Not started, Being set up, Slips to check, Final, to pay, Paid …), the net pay and the number of employees. Press Start pay run on a month, or click its card to open its pay run: one page of nine numbered steps, each marked Done, Next, Blocked or Later.
- Set up the run: the period, posting date, payroll payable account, and the bank or cash account salaries are paid from.
- Employees: fetch them, then fix what the checks flag: no salary structure, no tax regime, no bank account or IFSC, no PAN, joiners and leavers, salary withheld.
- Attendance and leave: days not marked, absences and leave without pay. Open the muster to fix attendance first.
- Pay inputs this month: additional salary, incentives, retention bonuses, arrears, payroll corrections and salary withholdings.
- Create salary slips: drafts you can still correct.
- Review: totals by component and department, and every person against last month. Tick Only what changed more than 10% to see the unusual ones; Download register saves it.
- Submit salary slips: locks the slips and posts the payroll to the books. E-mail payslips sends each person their slip.
- Pay: Make bank entry (with the UTR) posts the payment; Show bank advice gives the transfer file for your bank.
- Statutory dues: PF, ESI, professional tax, LWF and TDS from this run, with a link to India statutory for the month.
Statutory files
Section titled “Statutory files”- PF: the ECR file for the EPFO portal. ESI: the upload file for the ESIC portal.
- Professional tax: each employee’s deduction checked against the slab of their state (slabs for the 20 states and Puducherry with the tax).
- Salary TDS: the Form 24Q text file for quarters up to March 2026; for the tax year from April 2026, Form 138 as an Excel layout to key in.
- LWF: the LWF tab totals the LWF salary component by state, with employee and employer shares. State LWF rates are not built in: add them as a salary component.
- Statutory registers: the wage and muster registers (Forms A to E and the Code on Wages forms), ready to print.
- The Provident Fund Deductions and Professional Tax Deductions reports list the month’s deductions.
Each pay run shows one status, and each payslip’s “This year” column shows the year to date.
Appraisals
Section titled “Appraisals”Open Appraisal cycles and press New cycle: the period, who is in it (by branch, department or designation) and the review template for each designation. Then Create appraisals and Start the cycle: employees write their self review and reviewers give feedback. Follow Completion by manager, Remind the people a stage waits on, and press Mark as completed once every appraisal is submitted.
My HR: for every employee
Section titled “My HR: for every employee”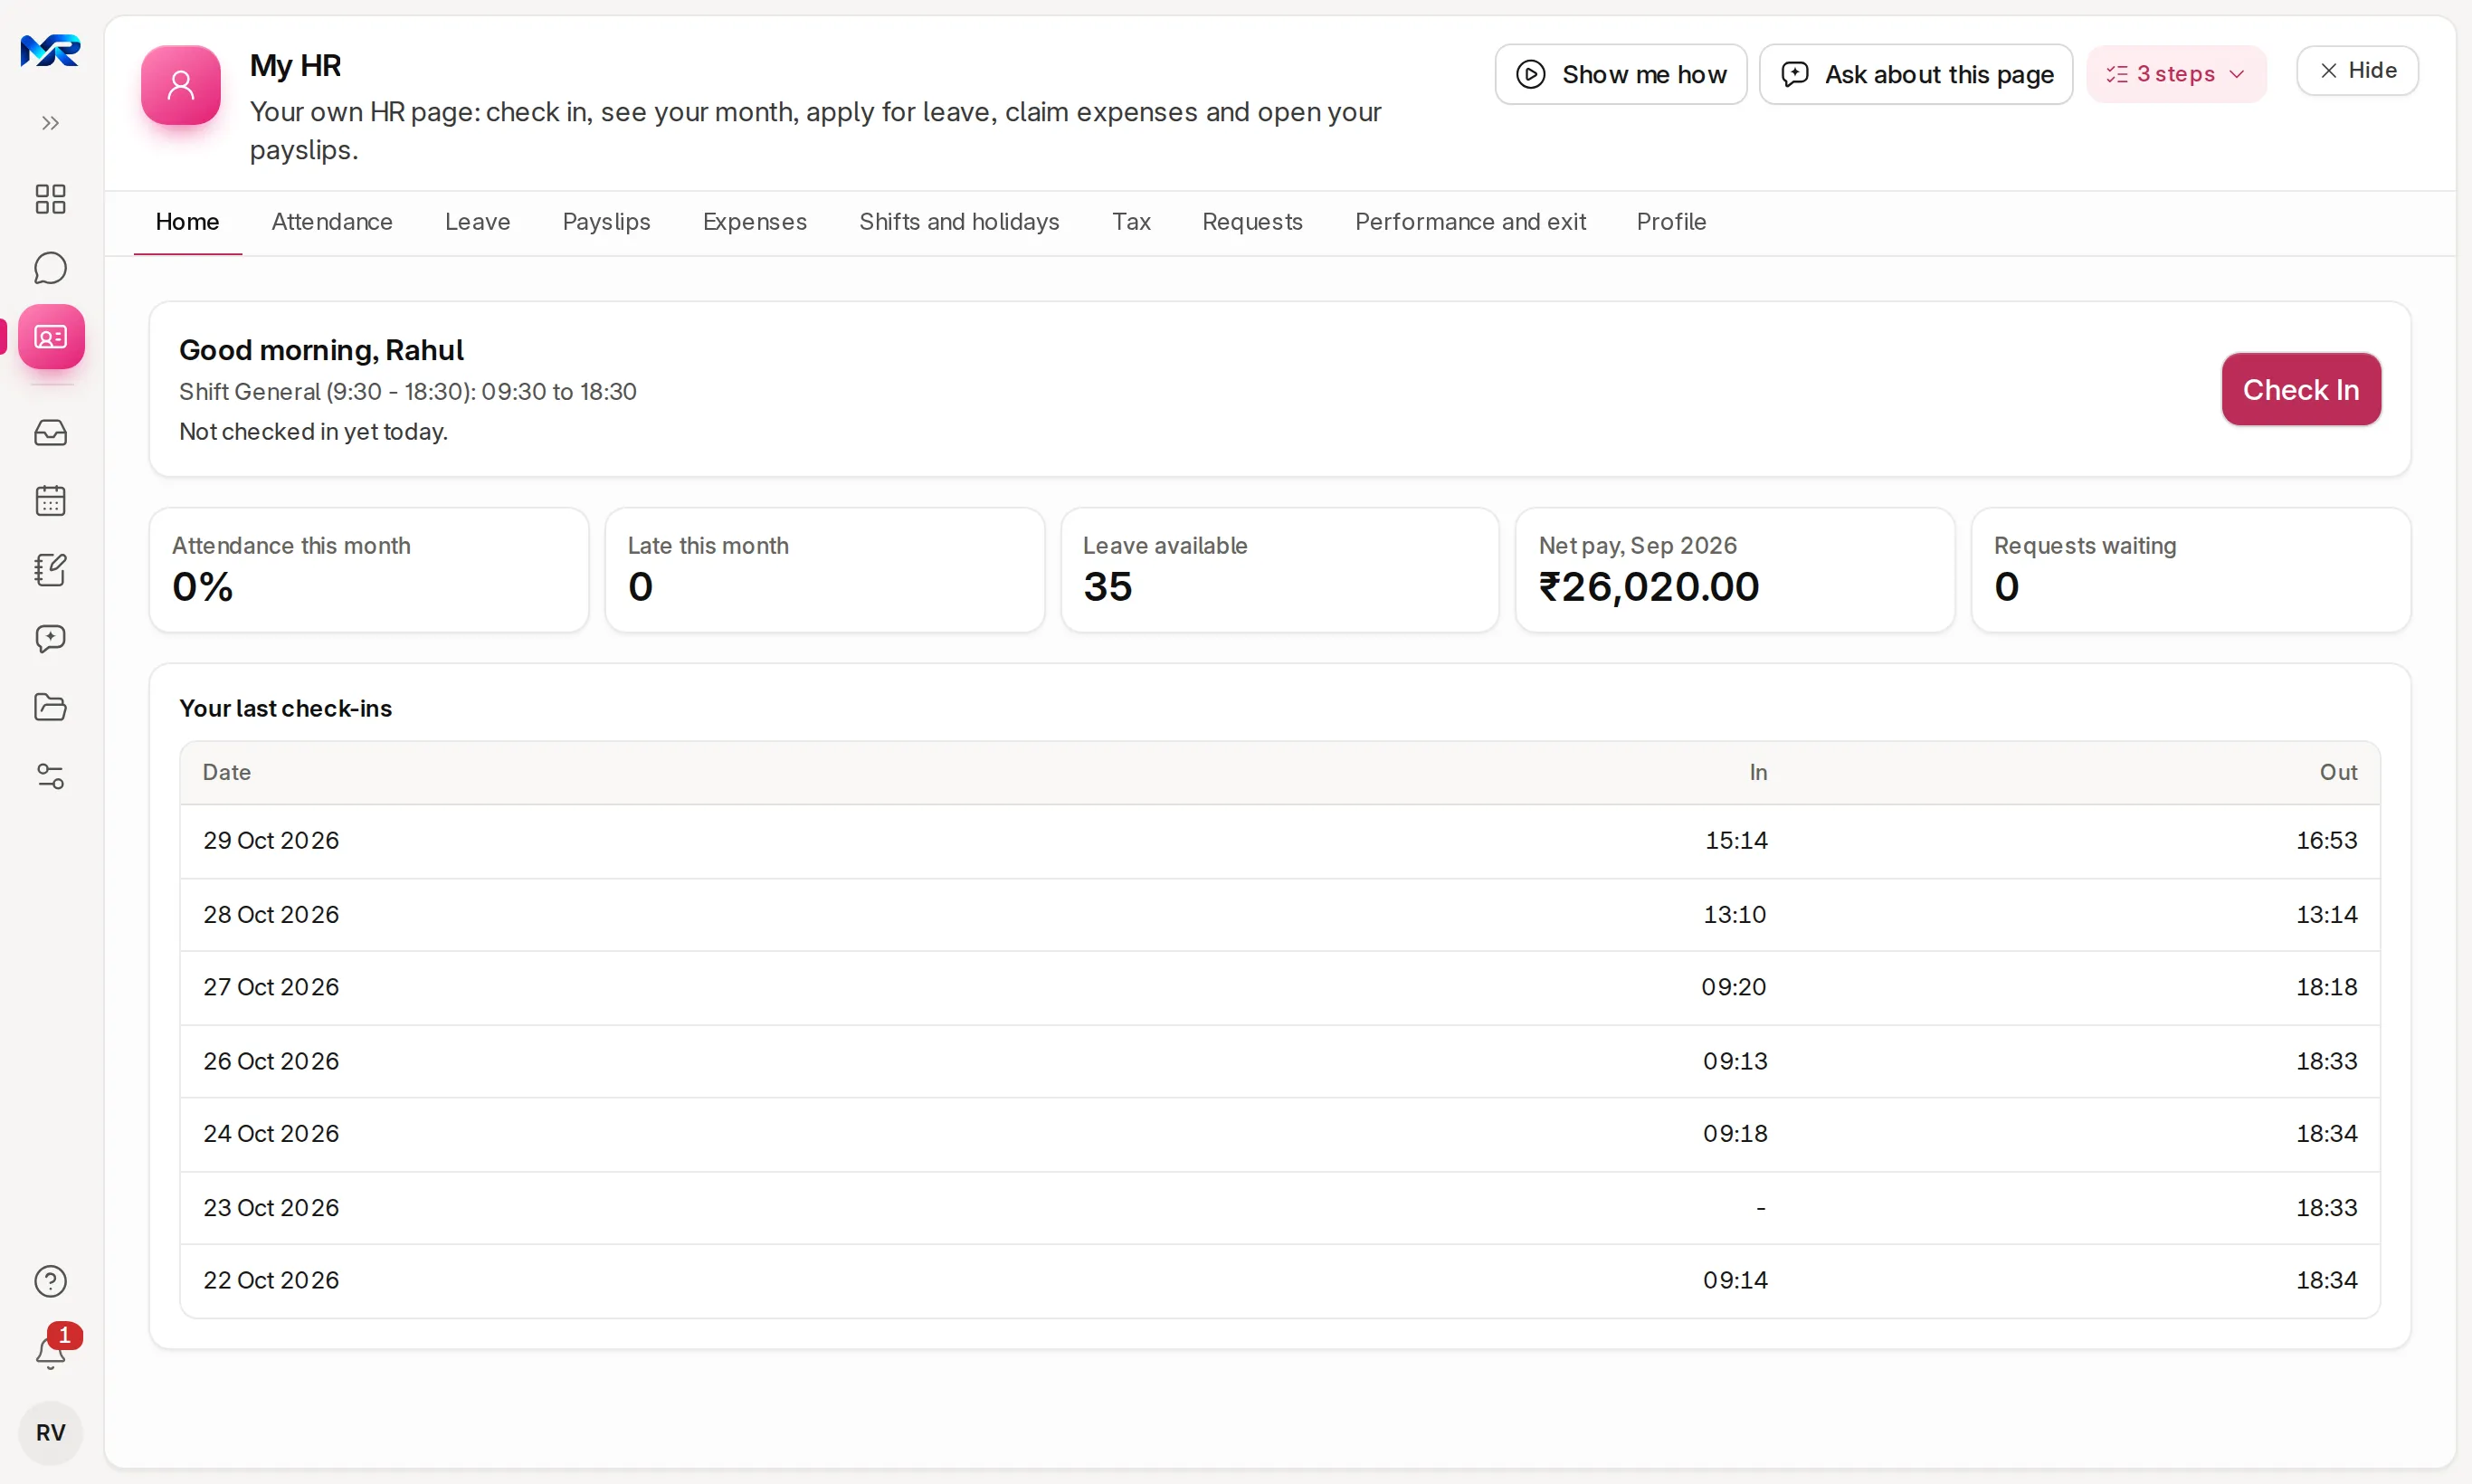
Every employee opens My HR from the rail. Its tabs are Home, Attendance, Leave, Payslips, Expenses, Shifts and holidays, Tax, Requests, Performance and exit and Profile; an approver also gets My team.
Check in and out
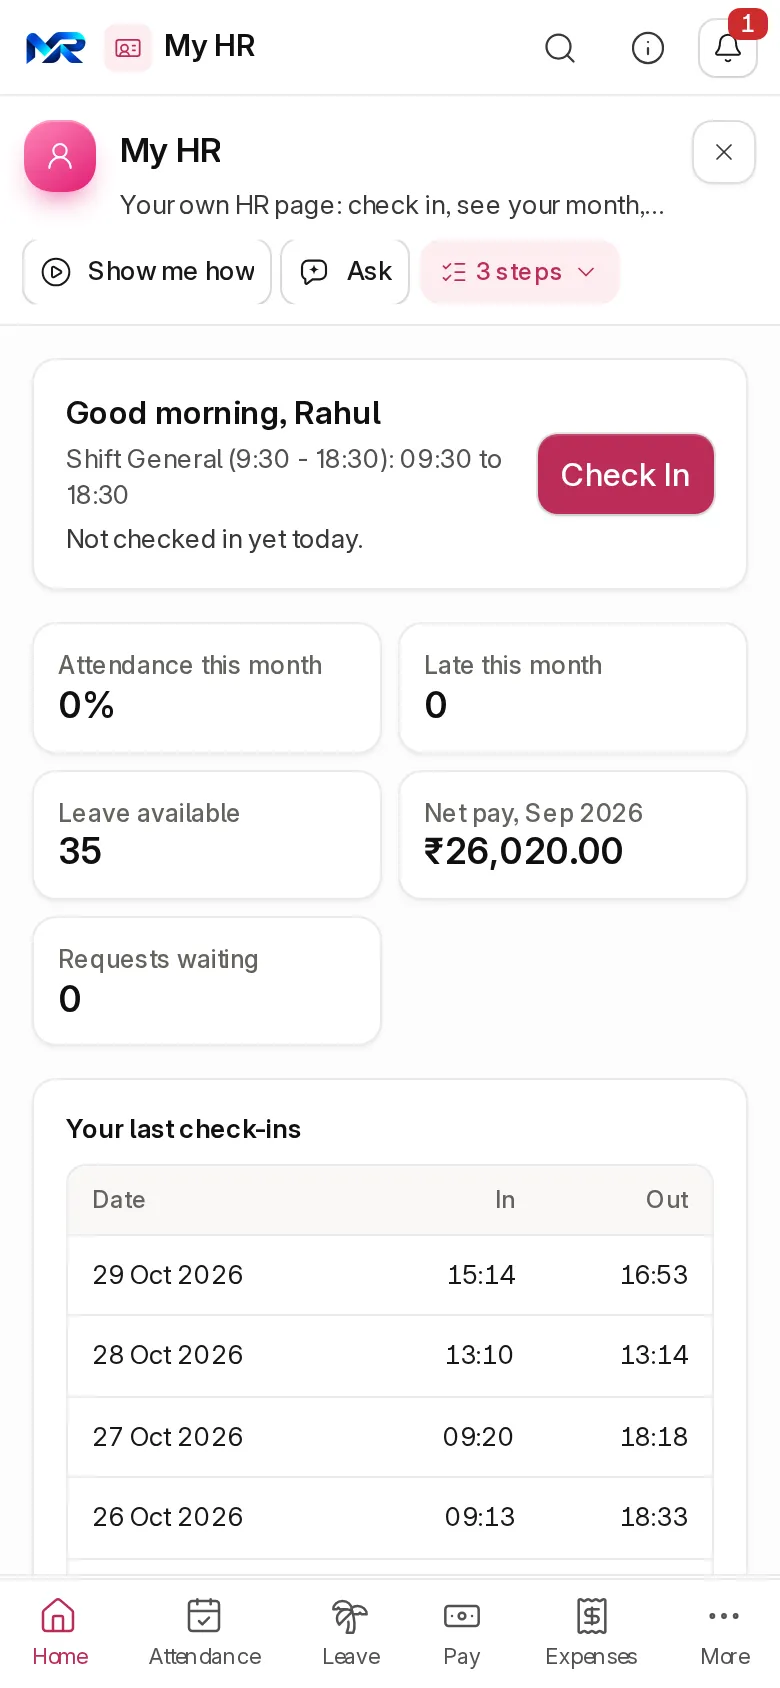
Section titled “Check in and out”Check In sits at the top of your Home and of My HR. Press it when you start work and Check Out when you leave. Today’s times and your recent check-ins show below. On a phone, check-in also works without a connection and is sent when you are back online.
Apply for leave
Section titled “Apply for leave”- Open Leave. Your balance per leave type shows first.
- Under Apply for leave, pick the leave type and the From and To dates (To cannot be before From). Tick Half day if needed and add a reason.
- Press Apply. The request goes to your approver and appears under My leave applications with its status. Withdraw takes it back.
The rules answer in place: a holiday, a date outside your allocation, an overlap with another application, or more days than you have.
Claim an expense
Section titled “Claim an expense”- Open Expenses › New expense claim.
- Fill Expense type, Date and Amount (₹), and what it was for.
- Attach a bill or photo: on a phone you can take a photo or pick one from your gallery.
- Press Submit claim. My claims shows it as pending approval, approved and awaiting payment, or rejected with the reason.
Several expenses in one claim takes many lines at once; Advances has Ask for an advance.
Payslips, tax and requests
Section titled “Payslips, tax and requests”Payslips lists each month’s slip with net pay and a PDF download. Tax holds your tax declarations and proofs. Requests asks for comp-off for working on a holiday, leave encashment and changes to your own details.
AI in HR
Section titled “AI in HR”These need the AI Assistant add-on (and an AI key on your own server), and AI switched on for your role:
- Brief me on the HR home, and Ask on Attendance for questions and commands.
- A photo of a paper attendance register is read into attendance for you to check; Classify with AI sorts attendance requests.
- On an expense claim, Read this bill reads the date, amount and shop from a receipt into a line, and Read with AI turns a typed or spoken line (“Taxi 450 yesterday”) into one.
- Draft with AI drafts an appraisal’s final review; Check fit with AI compares an applicant with the opening, and Prepare a brief with AI writes an interviewer’s brief.
Who sees this
Section titled “Who sees this”- HR User and HR Manager see the HR app. Leave Approver and Expense Approver see the requests addressed to them.
- Every active employee with a sign-in linked to their employee record sees My HR.
- An employee only ever sees their own records: their own check-ins, leave, claims and payslips. My HR acts only on the signed-in person’s own record, and this is checked on the server, not just by the page.
Still stuck?
Ask the team that set it up.
In MyRecords, Show me how walks you through any page. For your plan or a change, write to us.
- Updates and fixes included
- Changes whenever you want