
Lists, forms and reports
Every kind of record has a list of many records and a record page for one. Learn the controls once and they work everywhere.
That holds for invoices, customers, employees, tickets and the rest, and every report opens on the same kind of page. Pages built for one job (the till, the pipeline, the ticket page, My HR) add to these controls; they never take any away.
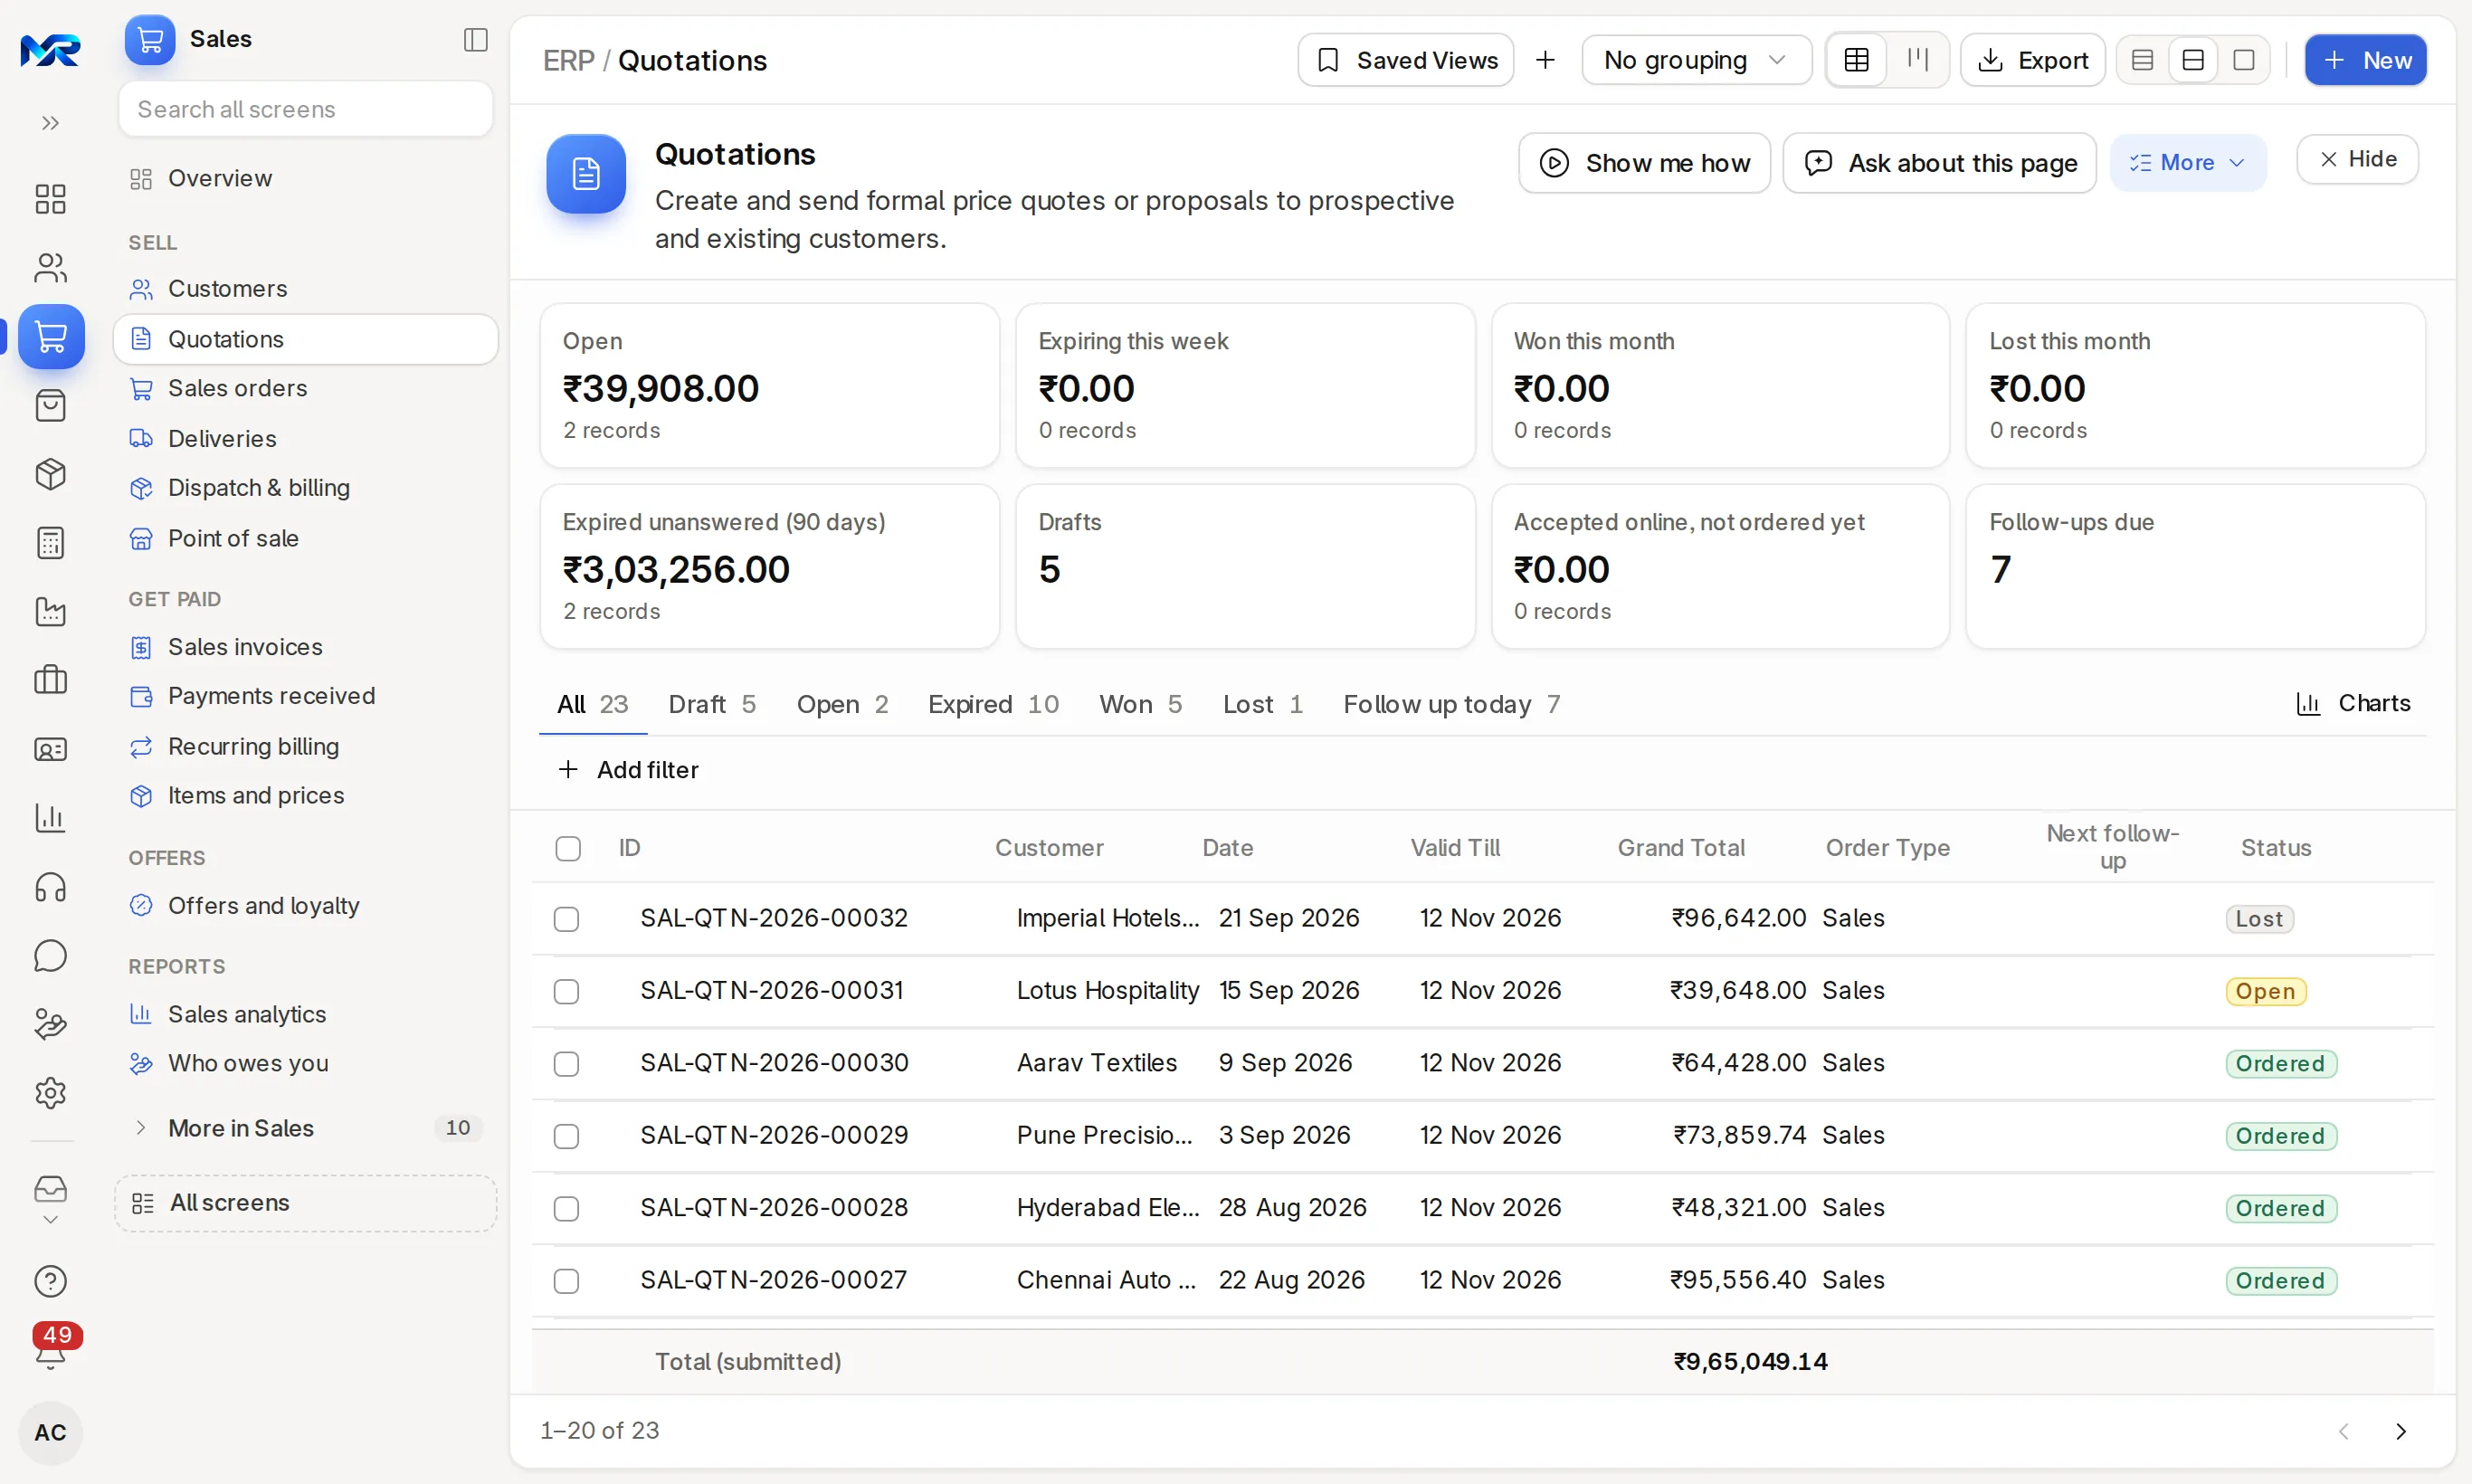
- The toolbar. The path shows the app and the list; press the app’s name to go back to its home. Saved Views, No grouping, Export, the density buttons and New sit here. New shows only when you may create this kind of record.
- Key figures and quick-filter tabs. Each list has the figures that matter for it (on Sales invoices: Outstanding, Overdue, Due in the next 7 days, Billed this month …) and ready-made tabs with counts (Draft, Unpaid, Overdue, Paid …). Charts opens the list’s charts. Figures and counts include only records you are allowed to see, so two people can see different numbers on the same list.
- The table. One row per record. Press a row to open it; hold Ctrl (⌘ on a Mac) to open it in a new tab. Press a column title to sort. Status shows as a coloured badge: amber for waiting, red for a problem, green for done.
- The footer. “1–20 of 163” and the arrows to the previous and next page.
Filter a list
Section titled “Filter a list”- Press Add filter. A row appears with three boxes: the field, the condition and the value.
- Pick the field, the condition (Equals, Like, In, Between two dates, Timespan such as “last month” …) and the value. A field that points to another record offers a search box.
- Add more rows; a record must match all of them.
- Remove one row with its ×, or all with Clear all.
Filters are kept in the page address, so the back button, a reload or a link you send to a colleague opens the same filtered list. The Total (submitted) row under the table adds up the amount columns over every matching record, not only the 20 on the page, and leaves out drafts and cancelled documents.
Save a view
Section titled “Save a view”- Set the filters, tab and sort you want.
- Press + next to Saved Views (“Save current filter as a view”).
- Type a View name, for example “Overdue, Karnataka”.
- Tick Shared (visible to everyone) to share it, or leave it for yourself. Only an administrator may share a view.
- Press Save. Open it again from Saved Views.
Group, export and act on many rows
Section titled “Group, export and act on many rows”- Grouping: pick a field in No grouping to see one line per value with a Count.
- Export: Export as CSV or Export as Excel gives every record that matches your filters, not only the page you see. If your role may not export this kind of record, the button is not there. Exports are logged under your name.
- Ticking rows: tick rows (or the title-row box for the whole page) and a bar appears with Export, Bulk Edit (one field, one value, applied to every ticked record, each saved with all its checks), Delete and, where a workflow applies, Workflow to move them all to the next step.
Records and forms
Section titled “Records and forms”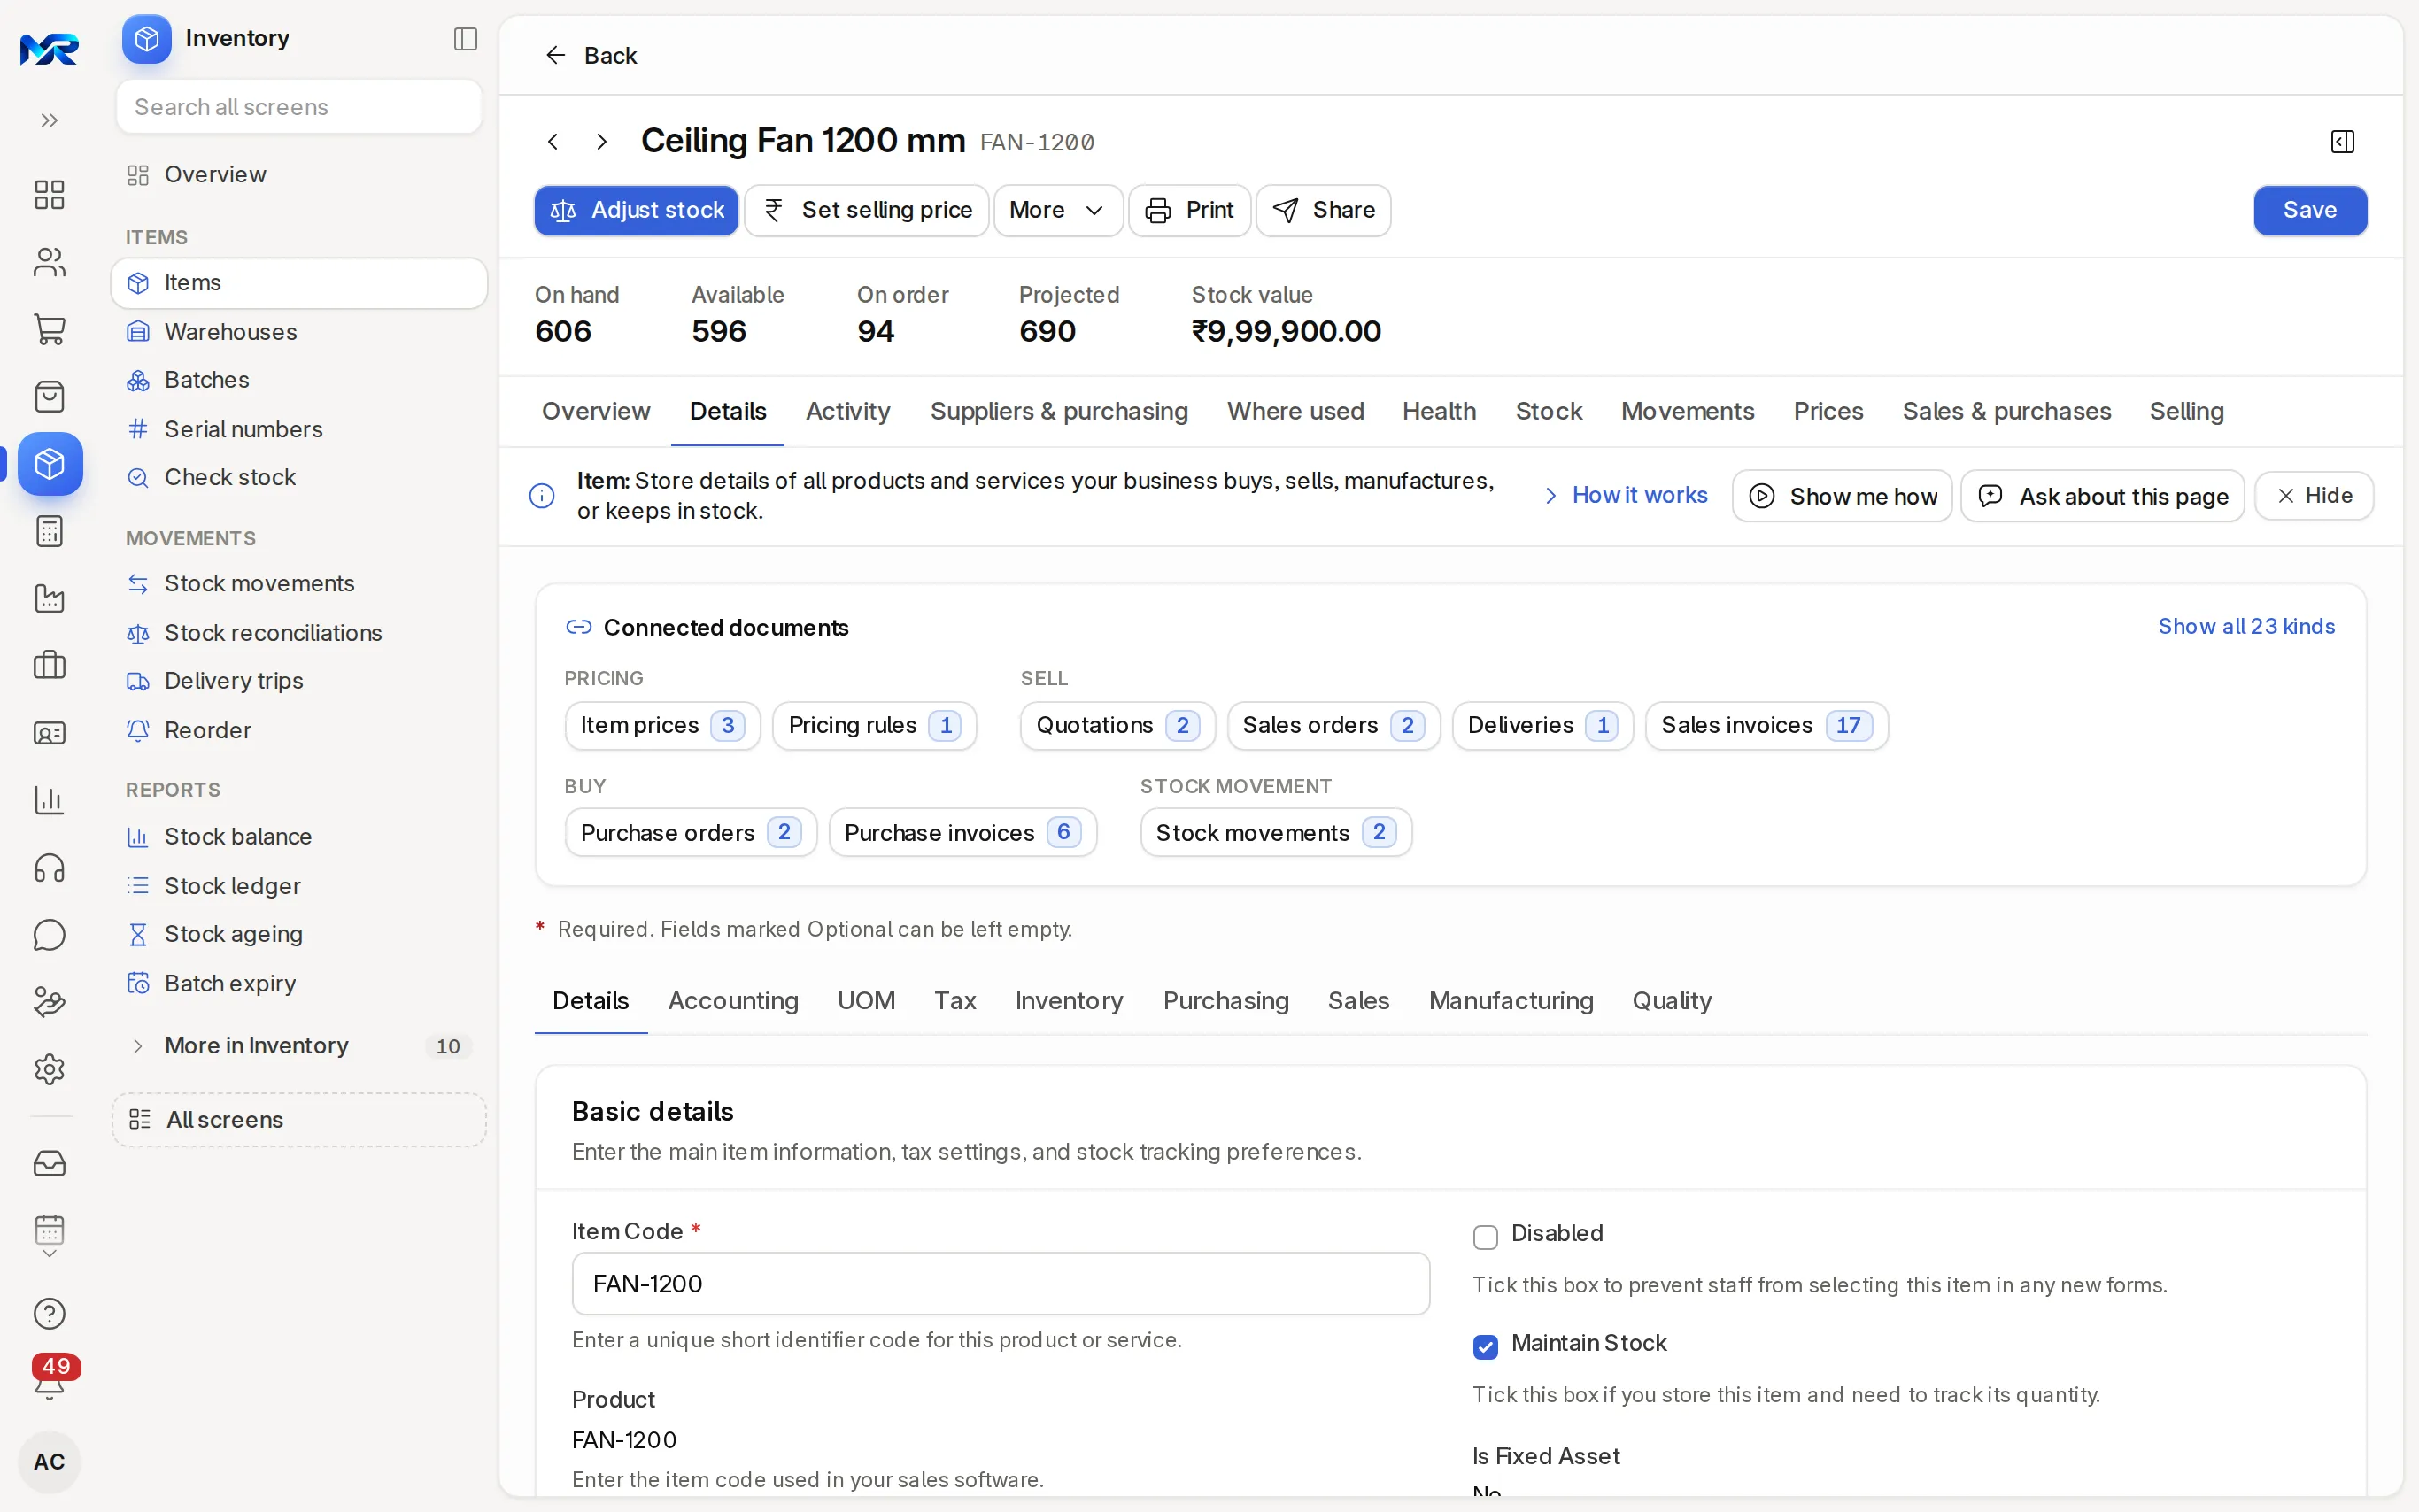
A record page has the same parts everywhere:
- The header: Back, the arrows to the previous and next record of your list (keys [ and ]), the name, number and status, and the action buttons. The main action is blue (on an unpaid invoice, Record payment); the rest sit under More, then Create, Print, Share and Save. Only actions you may take are shown.
- Key figures sum the record up: on an invoice, the total, the balance due, the due date and the tax.
- Tabs: Overview (key details at a glance), Details (the whole form), Activity (history and comments), then tabs for this kind of record.
- Connected documents lists what was made from this record, with counts; press one to open them as a list.
- The side panel holds Attachments (PDF, Word, Excel, CSV, text, JPG, PNG, GIF, WebP and ZIP, up to 25 MB), Assign to (the record lands in a colleague’s to-do list, with a notification), Share with (give one colleague access to this one record) and Comments (with @mentions).
- Preview, under a field that points to another record (a customer, an item), shows that record’s key figures without leaving the page, with Open.
Fill in a new record
Section titled “Fill in a new record”- Press New on a list, a shortcut on Home, or Create New in a picker.
- Fill in the fields marked with a red *. The amber pill counts what is still missing; press it to jump to the first one. A grey hint under each field says what to enter.
- Fill in whatever else you know. Company, series, dates, currency and price list are filled for you. Picking a customer or an item fills its address, price, tax template, unit and warehouse, and the totals recalculate a moment after you stop typing. Nothing you typed yourself is overwritten.
- Press Save. The record gets its number, its tabs and its side panel.
A table such as Items takes one row per line: Add row adds one, Enter moves to the next cell, Ctrl+D copies a row, Ctrl+Delete removes it, and you can paste rows from a spreadsheet. The eye at the end of a row shows every field of that row.
If you try to leave a page with changes you have not saved, MyRecords asks first (“Leave this page?”, with Stay on this page). A ticket reply, a leave request, a chat message or a maintenance visit you have not sent is kept as a draft and offered back when you return, on this or another device.
Draft, submit, cancel and amend
Section titled “Draft, submit, cancel and amend”Setup records (a customer, an item) are simply saved and changed when needed. Documents that count in the books go through a life cycle:
- Draft: save it as often as you like; it counts nowhere yet.
- Submitted: Submit asks you to confirm, then locks the document. Now it counts: the invoice is in what the customer owes, the stock has moved, the ledger is posted.
- Cancelled: Cancel reverses the entries the document made. It stays on file, marked Cancelled.
- Amend: on a cancelled document, Amend makes a new draft copied from it, linked to the old one. Correct it and submit.
Documents with an approval workflow show an Actions button (Approve, Reject …) instead, when the step is yours to take.
Make the next document
Section titled “Make the next document”Create, on a submitted document, makes the document that follows it, already filled in: quotation → sales order or invoice; sales order → delivery note or invoice; delivery note → invoice or return; purchase order → goods receipt or bill; any invoice → payment or credit note. The new document opens as a draft: check it and save it.
Print and share
Section titled “Print and share”- Press Print. The Default layout is at the top; Other layouts follow. For sales invoices the default is the GST tax invoice (your GSTIN, the customer’s GSTIN, HSN, place of supply and the rounded total); the others are “Shop receipt, 80 mm printer” and “Simple invoice, without GST details”.
- The preview shows the document as it will print. A draft prints with a DRAFT heading.
- Press Download PDF to save or print it.
Share sends it without leaving the page: E-mail with PDF, WhatsApp or Copy link to PDF. A shared link opens only that document and stops working after its expiry date (30 days for WhatsApp shares and reminders). Anyone with the link can open it, so do not post it where strangers can see it.
Reports
Section titled “Reports”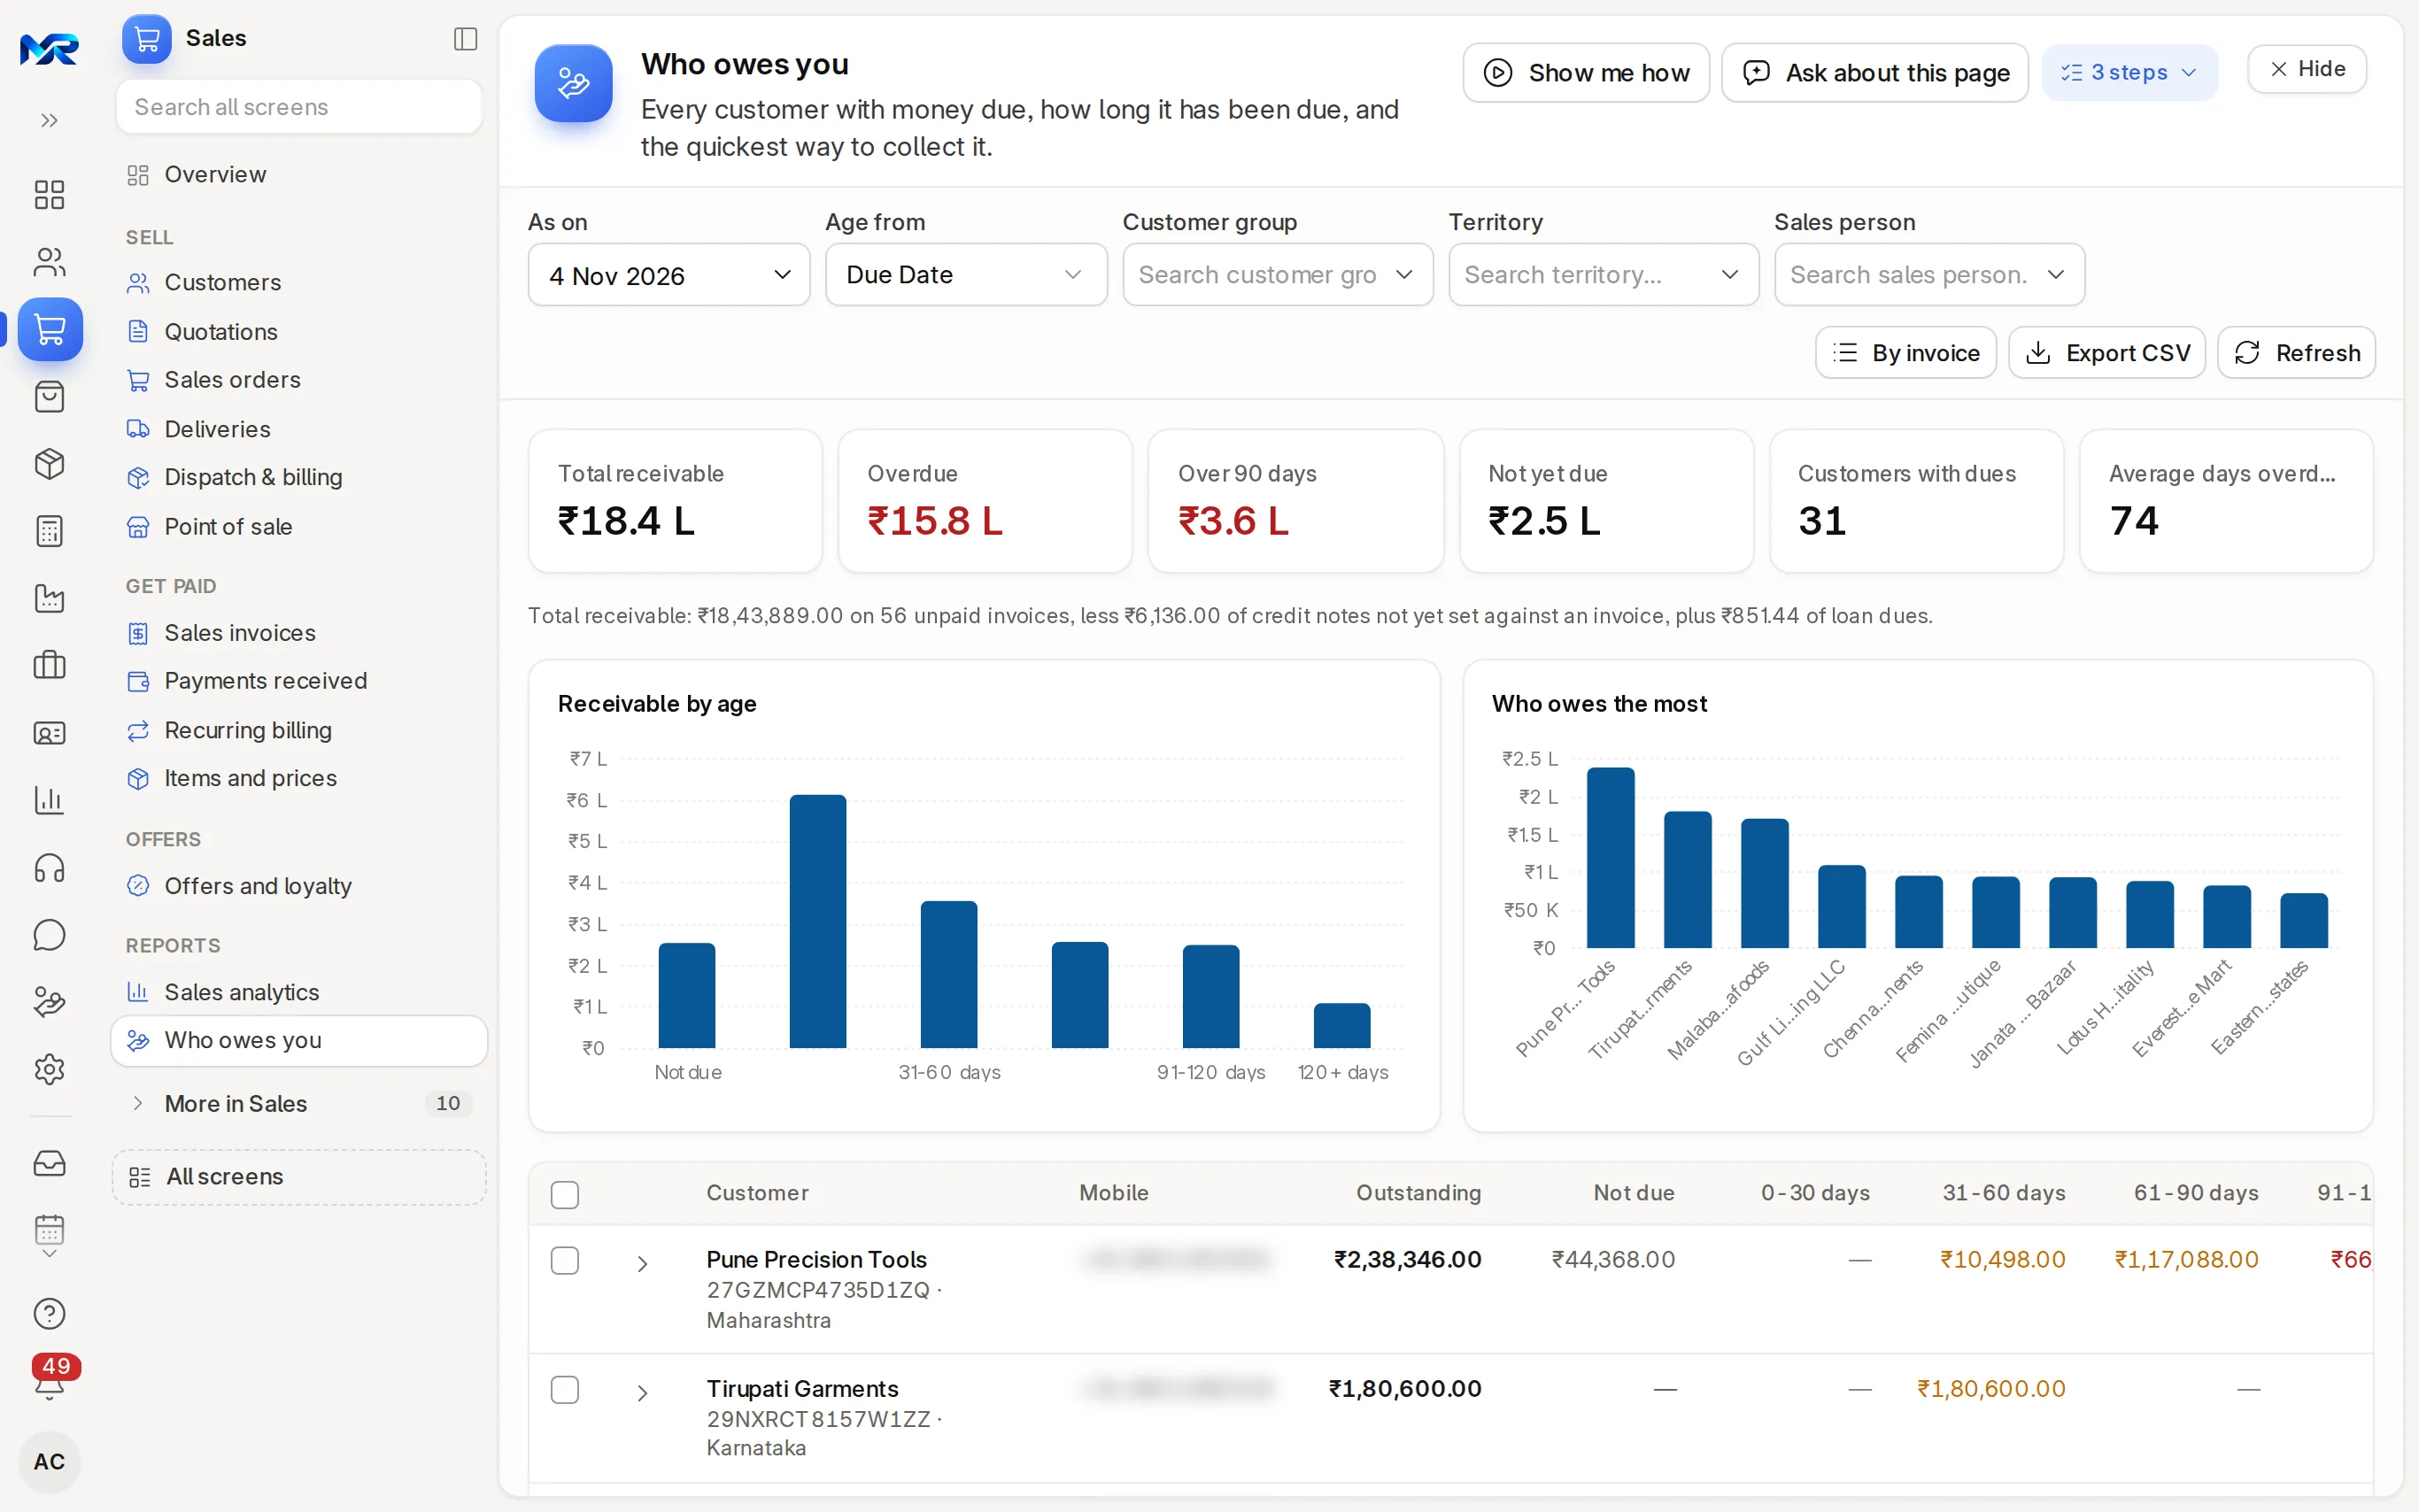
You find reports in the Reports group of an app’s menu, on the app’s home page, on All screens with the Reports chip, and with Ctrl K.
- Check the Filters. They open filled in: your company, the current financial year up to today and the report’s own defaults. A filter marked * must be filled.
- Press Run (or Enter in any filter). If a required filter is empty, the bar names it.
- Read the result. Blue values are links: a voucher number opens the document, a customer opens the customer, an account opens its ledger.
- Press Download for Excel, PDF or CSV (rows on screen).
- Saved filters › Save these filters… remembers a set of filters under a name.
- Reports over a period can Compare with previous period or Compare with same period last year.
- Some reports offer E-mail on a schedule: type the addresses, pick How often (every day, weekdays, every week or every month) and press Schedule.
- Key figures, a Chart box, totals and group lines appear where the report defines them.
- Heavy reports (General Ledger, Who owes you, Who you owe) are prepared in the background: the page says so, you may keep working, and a notification tells you when it is ready. The result shows Prepared at; press Refresh for the latest entries.
When a report shows nothing
Section titled “When a report shows nothing”- “Set the filters and press Run”: a filter is still needed, for example “Please select at least one filter: Item Code, Batch, or Serial No.”
- “No rows for these filters”: widen the dates or remove a filter.
- “This report needs a setting before it can run”: ask your administrator.
When you may not open or change something
Section titled “When you may not open or change something”- View-only: if your role may read a record but not change it, fields show as plain text and there is no Save, Submit or Cancel.
- No access: screens and reports you may not open are not in your menus. A typed address or an old link shows “You don’t have access to this”, with Back and Go to Apps.
- Errors: if a save is refused (a rule of the books, a missing value), the message appears in red and your entries stay as you left them.
Still stuck?
Ask the team that set it up.
In MyRecords, Show me how walks you through any page. For your plan or a change, write to us.
- Updates and fixes included
- Changes whenever you want